

You need to transfer photos from Android to iPhone after setup, and Apple’s official tool has quietly closed the door on you. Move to iOS only runs while an iPhone is being set up for the first time. If you skipped it, or the old Android phone was in a drawer that day, your photos got left behind, and the usual advice is to wipe the iPhone and start again. You do not have to. Here are your honest options, from brutal to easy.
Why Move to iOS will not help you anymore
Apple’s Move to iOS app is genuinely good at what it does: during the first boot of a new iPhone, it pulls your photos, messages and contacts across from Android in one go. The catch is in the words “first boot”. The option appears once, on the Apps & Data screen, and never again. The moment you tap past it and start using the phone, that path is gone.
This is how most people end up searching for how to transfer photos from Android to iPhone after setup. The new iPhone is already personalised, apps installed, banks logged in, watch paired. Then a week later you go looking for that photo from your cousin’s wedding and realise the entire Android camera roll never made the trip.
Option 1: factory reset and Move to iOS (works, but brutal)
The by-the-book fix is to erase the iPhone and run setup again. Go to Settings, General, Transfer or Reset iPhone, Erase All Content and Settings, then choose Move Data from Android during the fresh setup.
It does work, and if the iPhone is only hours old with nothing on it yet, it is a fair option. But if you have been using the phone for days or weeks, the cost is real: every app reinstalled, every login redone, banking apps re-verified, the watch re-paired, notification settings rebuilt. You spend an evening recreating a phone you already had, all to move some photos. Most people quite reasonably refuse, and they are right to.
Option 2: the Google Photos round trip
If the Android phone already backs up to Google Photos, you can install Google Photos on the iPhone, sign in, and see your library there. For browsing, that is fine. For actually moving photos into the iPhone Photos library, it gets slower: you save items to the device one by one or in small batches, and everything makes a round trip through Google’s servers first.
Two caveats deserve honesty. First, quality: if the Android phone backed up in Storage saver mode, which is the default suggestion on many phones, Google keeps a recompressed copy, and that compressed version is what your iPhone receives. The originals may only exist on the Android phone. Second, quota: full-quality backups eat into your 15 GB of free Google storage quickly, and a big video library can blow past it in one evening. If you already pay for Google One and back up in original quality, this route is workable, just slow and cloud-shaped.
Option 3: email or messaging, for a handful
For three or four photos, emailing yourself or using a chat app is the zero-setup answer. Beyond that it falls apart fast. Email caps attachments at roughly 25 MB, which one modern video exceeds. Messaging apps are worse in a sneakier way: WhatsApp and friends recompress photos and videos hard, so what arrives on the iPhone looks fine as a thumbnail and disappoints the moment you zoom. Fine for sending a meme, wrong for moving memories.
Transfer photos from Android to iPhone after setup with Ferry
The route we built, and the one we would pick even if we had not: a direct Wi-Fi transfer between the two phones. Ferry is an iPhone app that moves photo and video originals between Android and iPhone over your local Wi-Fi network. No cables, no cloud, no accounts, and no recompression: resolution, quality and capture metadata all survive the trip. The Android side needs nothing installed, because a plain browser does the job, though there is an optional Ferry Android companion app too. It works whenever you want, whether the iPhone was set up an hour ago or a year ago. Here is the whole process.
1. Start the receiver on the iPhone
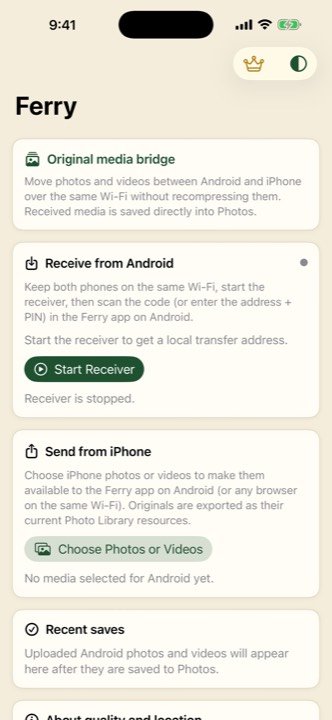
Open Ferry and tap Start Receiver. Ferry shows a QR code and a local address on your Wi-Fi network. Both phones need to be on the same Wi-Fi, which at home they almost certainly already are.
2. Scan the QR code with the Android phone
Point the Android camera at the QR code and tap the link that pops up. A transfer page opens in the phone’s browser. There is nothing to install on the Android side and nothing to sign in to.
3. Pick the photos and videos to send
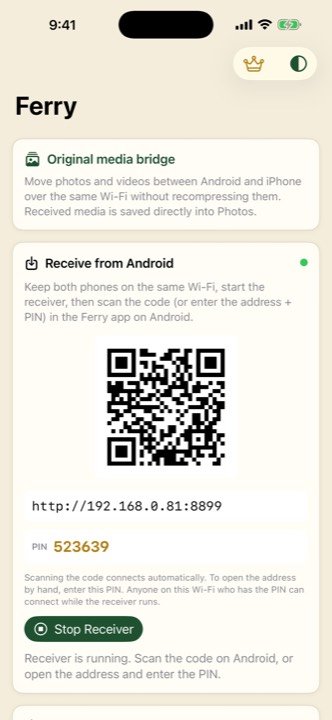
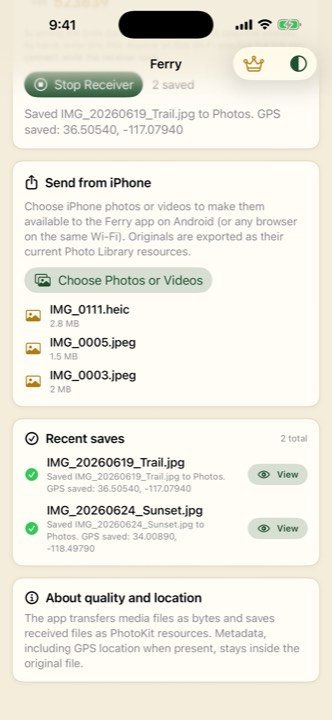
On the browser page, choose the photos and videos you want to move. Whole batches are fine, and big videos are fine too, because the files travel over your own network with no size cap and no server in the middle. Ferry also works in the other direction, so the Android phone can download iPhone media as originals if you ever switch back or share both ways.
4. Find them in the iPhone Photos library
This is the part that surprises people. Ferry writes received files with PhotoKit, so they land directly in the iPhone Photos app, not in some separate folder you have to import from. Full resolution, original quality, capture dates intact, ready to scroll.
Your Android photos, on your iPhone, in minutes
Free on the App Store. Works with any Android phone.
Download on theApp StoreSo which option should you actually use?
- iPhone is brand new and empty: a reset plus Move to iOS is acceptable, since there is nothing to lose yet.
- You already back up in original quality to Google Photos with room to spare: the round trip works, just budget time and check quality settings first.
- Three photos, right now: email yourself and move on.
- Everyone else: a direct Wi-Fi transfer is the way to transfer photos from Android to iPhone after setup without wiping anything, and it keeps your originals.
Whichever route you pick, open a couple of transferred photos at full zoom on the iPhone before deleting anything from the Android phone. If quality matters to you beyond this one move, we also wrote a full comparison of how to move photos from Android to iPhone without losing quality.
Frequently asked questions
Can I use Move to iOS after setting up my iPhone?
Not without erasing the phone. Move to iOS only appears during the initial setup of an iPhone, so once the phone is set up you would need to factory reset it and start over to use the app.
How do I get Android photos onto my iPhone without resetting it?
Use a direct Wi-Fi transfer. Ferry runs on the iPhone and shows a QR code; the Android phone scans it in its browser and sends photos and videos straight into the iPhone Photos library as originals. No reset, no cables, no cloud.
Will my photos lose quality if I use Google Photos instead?
They can. If the Android phone backed up in Storage saver mode, Google Photos stores recompressed versions, and those are what your iPhone downloads. Original quality backups keep full resolution but count against your storage quota.
Do transferred photos land in the iPhone Photos app?
With Ferry, yes. Received files are written with PhotoKit, so they appear directly in your Photos library like any photo you took, not in a separate folder or files app.